GETTING STARTED
In this section, you will be preparing your computer for the upcoming semester. NOTE, this will only affect the computer you are currently sitting at. Should you have to change computers for any reason, you will have to complete some of these steps again.
Google Classroom

Throughout the duration of the course, we will be using Google Classroom for assignments, resources, and announcements. Follow the directions below to sign up for your course Google Classroom.
- Go to the website classroom.google.com and sign in with your your OCDSB account if you have not already done so.
- On the Home page, click the (+) symbol
- Enter the code provided by your teacher and click Join
You should now have access to the course resources on Google Classroom. Be sure to see your teacher if you have any difficulties.
Chrome

Before beginning, check to see that Chrome is installed on your computer. Don’t worry if it isn’t as you’ll get the chance listed in the steps below.
- Go to the website http://www.gcflearnfree.org/chrome/getting-started-with-google-chrome/full/
- If Chrome is NOT INSTALLED on your computer, follow the steps listed under the section To download and install Chrome
- Once Chrome is installed, or if it already is, follow the directions listed under Signing in to Chrome to log into the browser.
- Be sure to use your school email address and NOT your personal one
- Once logged in, be sure to choose the option to Link Data. This will allow you to view your bookmarks and history from any computer where you are logged into Chrome.

Google Drive
For those that don’t know, Google Drive is a file storage and synchronization service created by Google. It allows users to store files in the cloud, synchronize files across devices, and share files.
As a student at the OCDSB, you have been given an account for free with unlimited storage.
CREATING A FOLDER FOR THE COURSE
- Go to drive.google.com
- If you have not already done so, you will be prompted to enter your OCDSB username and password
- DO NOT USE YOUR PERSONAL EMAIL ACCOUNT
- When doing school work, always use the account provided to you by the school
- On the left, click New and then Folder.

- Enter your course code as the name for the folder
- Click Create

You should now have a folder for your course on Google Drive. This folder should be used to always keep a backup of your current project. This will ensure that you don’t have to start a project over again should you encounter and technical difficulties.
Once you have created your folder, you will change the sharing permissions so that anyone in the OCDSB with the link can view. If you are not sure how to do this. visit the Google Support Site to learn more.
Setting Up Your Computer

When you click the Start button ![]() and choose ‘Computer’ (Windows 7) OR choose File Explorer
and choose ‘Computer’ (Windows 7) OR choose File Explorer ![]() (Windows 10), you should see something like the following:
(Windows 10), you should see something like the following:
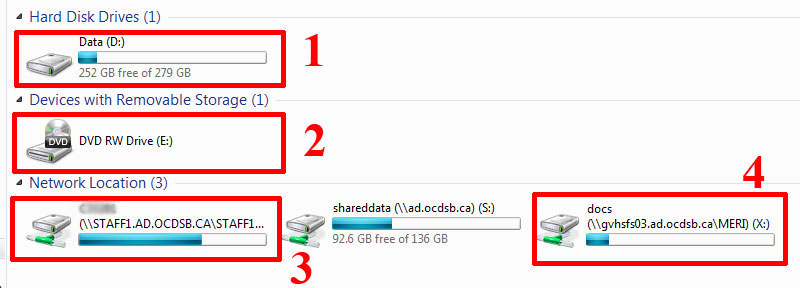
Here are the computer drives explained:
1. Data (D:) Drive
This is your physical machine. Saving to this drive will save to the hard drive in your computer. This means that you can’t switch computers as you will not have access to your files.
NOTE: This is were we will be saving our files this semester.
2. DVD RW Drive (E:)
This is your CD/DVD Drive. We will most likely not be using this during the semester
3. Network (P:) Drive
This is the school network. It will be labeled with your username (firstname.lastname) and have OCDSB.CA in the name. Saving here puts your files on a computer located at the board office. Only you and teachers will have access to this folder. We WILL NOT be saving to this drive.
4. docs (X:) Drive
This folder contains the handin and handout folders. This is where you will get some necessary files for the course but you WILL NOT be handing in files here. We will discuss that at another time (Google Classroom).
Double click on this folder to see what it contains.
NOTE: We will not be using the sharedata (S:) drive
SETTING UP YOUR COMPUTER
Create a folder on the Data (D:) Drive called YourName – Course Code, where YourName is your actual name and Course Code is the course you are currently enrolled in.
Inside that folder, create a folder called downloads, where you will place any file that you download for this course.
That’s it! Your computer is ready to go.
Bookmarks and Downloads
BOOKMARK THE CLASS WEBSITE
You will now create a bookmark for our course website. Go to the website mrhughes.ca, navigate to your course page (eg. TGJ2O, ICS3U, etc…) and create a bookmark. Use the resources below if you are unsure how to do this. There will be more bookmarks as we continue through the course.
Creating Bookmarks
Organizing Bookmarks
DOWNLOADS FOLDER
***In the last few years this feature has not been available to students. You are welcome to try it to see if things have changed since then***
By default, the computers are set to download everything to your profile on the C:\ Drive. That’s great! Except that you are not allowed access to this drive.
In this section, we will be changing the default location of where the files will download when using Google Chrome.
NOTE: Although these steps are for Chrome, they can be set for any browser (should you wish to use something else). See your teacher if you are unsure on how to change the settings for another browser.
CHANGING DEFAULT DOWNLOADS LOCATION IN CHROME
You can choose a location on your computer where downloads should be saved by default or pick a specific destination for each download.
- Click the Chrome menu
on the browser toolbar.
- Select Settings.
- Click Show advanced settings and scroll down to the Downloads section.
- To change the default download location, click Change and select where you’d like your files to be saved.
Choose the Downloads folder you made on your D: Drive. - If you’d rather choose a specific location for each download, select the Ask where to save each file before downloading checkbox.
- NOTE: The C:\ Drive will not work as you do not have access to it.
- To change the default download location, click Change and select where you’d like your files to be saved.

Setting Up Email
Have another email account that you check more often then your school account? Have your school email sent there! Follow the directions in the link below to make that happen.
https://support.google.com/mail/answer/10957?hl=en